To order section (page), please using order in Page Attributes. Please check the screenshot below to understand it better.
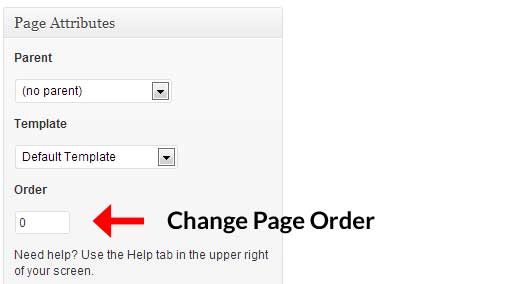
Image credit: wpbeginner.com
You change in header.php:
<header class="ip-header <?php echo ($jellythemes['loader'] ? 'disabled' : ''); ?>">
To:
<header class="ip-header <?php echo ((is_single() || is_home()) ? 'disabled' : ''); ?> <?php echo ($jellythemes['loader'] ? 'disabled' : ''); ?>">
If you have Visual Composer with a theme which you’ve purchased from ThemeForest, then you don’t need to activate it.
Please see this link: http://themeforest.net/forums/thread/visual-composer-licence-key/133679
Please go to http://themeforest.net/downloads and download latest version of our theme
Please follow this video to update our theme in your website.
To order section (page), please using order in Page Attributes. Please check the screenshot below to understand it better.
Image credit: wpbeginner.com
Please create google key here: https://developers.google.com/maps/documentation/javascript/get-api-key
The google maps script will available in:
For Epic - Storm - Build: \inc\functions.frontend.php
For Solido: \solido\footer.php
wp_enqueue_script(
                'gmaps',
                '//maps.googleapis.com/maps/api/js',
                array('jquery'),false,true );
Then add the key like:
wp_enqueue_script(
                'gmaps',
                '//maps.googleapis.com/maps/api/js?key=put-your-key-here',
                array('jquery'),false,true );
For Elixir: \inc\functions.shortcodes.php line 253
<script type="text/javascript" src="http://maps.google.com/maps/api/js?key=put-your-key-here"></script>
Then check your website again.
Please open this file:
epic-jellythemes/js/default.js line 200
The default code will look like:
/* Home background slider */
        $("#owl-main").owlCarousel({
            autoPlay: 3500,
            navigation: true,
            goToFirst: true,
            goToFirstSpeed: 2000,
            slideSpeed: 700,
            pagination: true,
            transitionStyle: "fade",
            singleItem: true,
Change it to:
/* Home background slider */
        $("#owl-main").owlCarousel({
            autoPlay: $("#owl-main .item").length>1 ? 3500 : false,
            navigation: true,
            goToFirst: true,
            goToFirstSpeed: 2000,
            slideSpeed: 700,
            pagination: true,
            transitionStyle: "fade",
            singleItem: true,
Then check your site again
Go to
\epic-jellythemes\css\colors\
Create a new file name: custom-color.css and copy style from black.css file to new file.
Then change all the hex color code to your color. The new file will look like below:
#owl-main .owl-controls .owl-page.active span, #owl-main .owl-controls.clickable .owl-page:hover span, .carousel-wrapper.with_pagination.round_inner .owl-theme .owl-controls .owl-page.active span {
    background:your-hex-color-code-here;
    border-color:your-hex-color-code-here;
}
a.close.top {background: url(../../images/close/blacks-close-project.png) no-repeat;}
.ip-header .ip-loader svg path.ip-loader-circle {stroke: your-hex-color-code-here;}
.project-info h4:after {background: your-hex-color-code-here;}
.project-info .btn2 {color: your-hex-color-code-here;}
.section .text strong, a {color:your-hex-color-code-here;}
.section .title {border-color:your-hex-color-code-here;}
#header .menu-item.current a, #header .menu-item a:hover {border-bottom-color:your-hex-color-code-here;}
#header .menu-item.current .sub-menu a {border-bottom-color: transparent;}
#header .menu-item.current .sub-menu a:hover {border-bottom-color: your-hex-color-code-here;}
.options-head {background: your-hex-color-code-here; }
.carousel-wrapper.with_buttons .owl-controls .owl-buttons div,.carousel-wrapper.with_buttons .owl-controls .owl-buttons div.owl-next {background-color: your-hex-color-code-here; }
.carousel-wrapper.full .generic-carousel .owl-item .ulitem li .icon {background: your-hex-color-code-here; }
.carousel-wrapper.with_pagination .owl-controls .owl-page.active span, .carousel-wrapper.with_pagination .owl-controls.clickable .owl-page:hover span {background: your-hex-color-code-here; }
.team-wrapper .team-member .hover .name {color: your-hex-color-code-here;}
.team-wrapper .team-member .hover .hover-border, .post .tags a {border-color:your-hex-color-code-here;}
.folio-filter li a.selected, .folio-filter li a:hover {
    background:your-hex-color-code-here;
    border-color:your-hex-color-code-here;
}
.portfolio-dark-overlay {background:your-hex-color-code-here;}
.section .button:hover, .section .button.playstop, .contact-form .submit, .section .button.inverse, .post .date {border-color:your-hex-color-code-here;}
#footer .thanks, #testimonials, #our-story{background-color: your-hex-color-code-here; }
.slide-sep, .section .ball, .comment-reply-link, #respond input[type=submit] {background: your-hex-color-code-here;}
Then go to:
\epic-jellythemes\inc\theme.options.php
Find color or go to line 820, you will see the code below:
array(
    'id'=>'color',
    'type' => 'select',
    'title' => __('Theme color scheme', 'jellythemes'),
    'subtitle' => __('Select your themes alternative color scheme.', 'jellythemes'),
    'options' => array('blue'=>'Blue',
                        'black'=>'Black',
                        'green'=>'Green',
                        'red'=>'Red',
                        'yellow'=>'Yellow',
                        'purple'=>'Purple',
                        'turquoise'=>'Turquoise',
                        'orange'=>'Orange',
                ),
    'default' => 'red',
),
Add your new custom color in here, it will similar new code below:
array(
    'id'=>'color',
    'type' => 'select',
    'title' => __('Theme color scheme', 'jellythemes'),
    'subtitle' => __('Select your themes alternative color scheme.', 'jellythemes'),
    'options' => array('blue'=>'Blue',
                        'black'=>'Black',
                        'green'=>'Green',
                        'red'=>'Red',
                        'yellow'=>'Yellow',
                        'purple'=>'Purple',
                        'turquoise'=>'Turquoise',
                        'orange'=>'Orange',
                        'custom-color'=>'Custom Color',
                ),
    'default' => 'red',
),
Now, you can change to new color in theme option, please make sure you save it because it will lose when you update our theme.